USER INSTRUCTIONS
IMPORTANT
Before using your Fendertex fenders, carefully read the following warnings and instructions. Failure to properly follow the warnings and instructions could lead to personal injury or even death, or physical, environmental or property damage.
NEED ASSISTANCE?
If you have any questions or need assistance please contact us and one of our Fendertex experts will help.
CONTACT US- The fender size is written on the bottom ofthe bladder.
- Always inflate Fendertex Fenders to the appropriate pressure indicated on Table 1. Measure the pressure according to a calibrated pressure gauge for each fender. Never underfill your fenders.
- Do not undersize your fenders. The size of your Fendertex Fender should match the size of your vessel based on our sizing guide, to ensure safe moorage. Select Fendertex Fenders according to the size of your vessel or according to their use or fender shape.
- Fendertex Fender sizes can be customized to fit your specific application or goal. If ordering a custom length or width, we recommend purchasing spare bladders as custom sizes will take longer to build replacements in the case of puncture.
- For prolonged moorage and/or the presence of strong wind, ballast your fenders.
- For prolonged moorage, check the pressure of fenders at least every 2 months with a calibrated pressure gauge.
- Fendertex Fenders can be stored both inflated for quick use or deflated to save space.
- All Fendertex Fenders are machine washable.
- Always air dry. Do not iron or tumble dry.
- Consider a reinforced fender cover when mooring against concrete or abrasive docks, or used on commercial vessels and vessels weighing more than 2,000 tons.
- Operating temp of 250°F to -120°F (122°C to -85°C).
- Do not use an air valve wrench on the inflation valve of Fendertex Fenders.
- Take necessary care not to puncture or cut the fender.
- The valve stem is closed when in the up position, and open when in its down position.
- When hanging the fender horizontally a Fendertex Longside Cover is required.
- Do not hang Fendertex Fenders horizontally without a Longside Cover. Doing so will damage the valve over time.
FENDER COMPONENTS
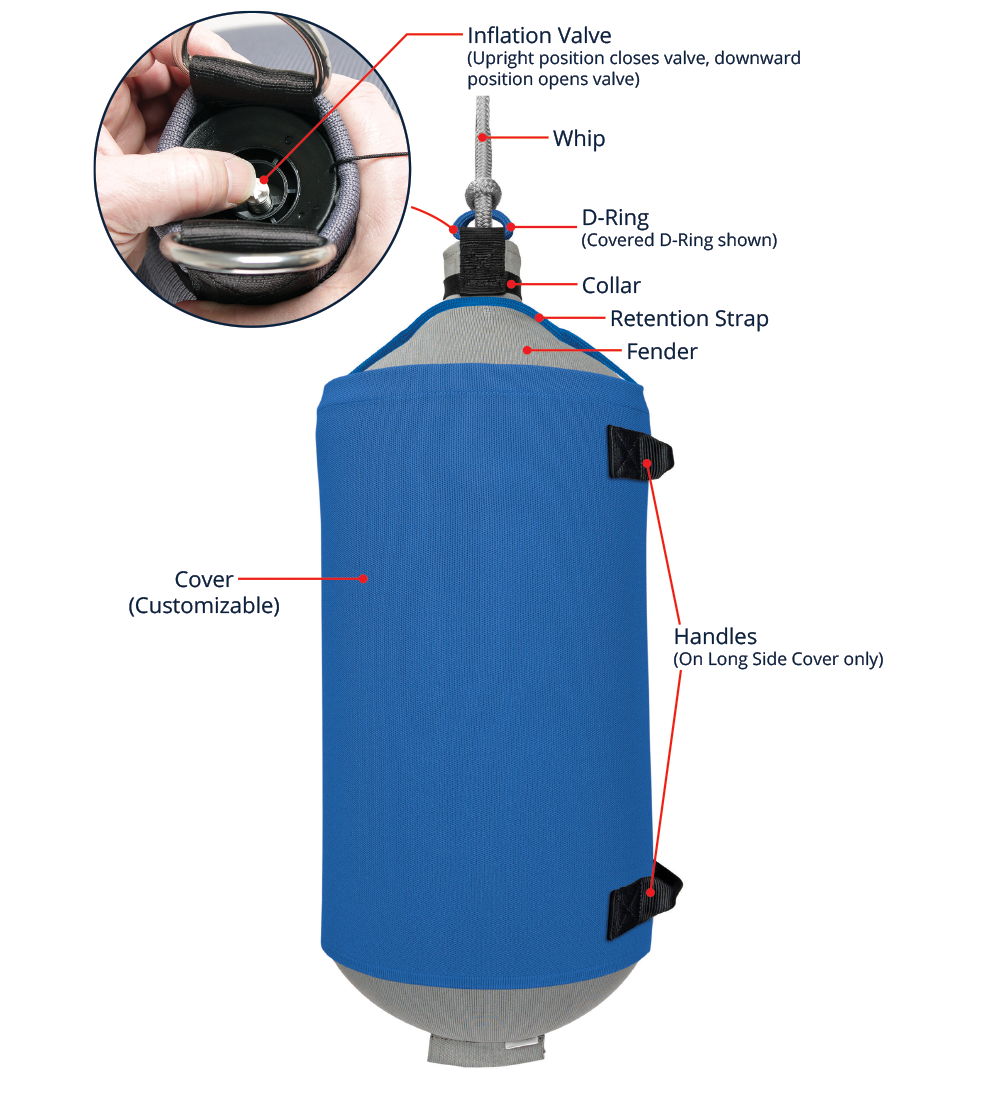
Image 1
GENERAL INFORMATION
MATERIALS
All Fendertex fenders and covers are made from a knitted polyester textile. The bladder is made from polyurethane.
FENDERTEX COVERS
Fendertex Fenders do not need a cover to function properly, however it is highly recommended to add a Fendertex Cover when used on workboats, or fending off an abrasive concrete docks and vessels weighing 2,000 tons or more. Long Side Covers are required to hang Fendertex Fenders horizontally. The retention strap goes around the fender collar.
TEMPERATURE FLUCTUATIONS
Fendertex Fenders will not release air in temperature fluctuations like PVC fenders. The top and bottom portions will expand approximately 7% and the middle portion will not expand allowing the mid section (protective contact area) to maintain its shape during temperature changes. This helps eliminate the need of reinflating the Fendertex Fenders during temperature fluctuations.
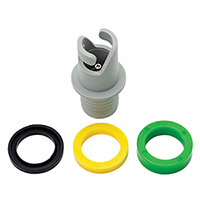
Image 2
INFLATION ADAPTER
To inflate the Fendertex Fenders, use the standard Halkey Roberts style adapter fitted on most pumps and supplied with each order (image 2). Each adapter from Fendertex has three spacers colored yellow, black, and green. All Fendertex models will use the black and yellow spacers only. You do not need the green spacer for Fendertex Inflation. The small screw in the center of the inflation adapter must be tightened all the way down before use.
Table 1 (Do not use Fendertex Fenders underinflated)
| Cylindrical Models | C62 | C73 | C84 | C104 | C124 | C145 | C175 | C207 | C248 |
|---|---|---|---|---|---|---|---|---|---|
| Minimum Pressure | 5.1 PSI | 5.1 PSI | 5.1 PSI | 5.1 PSI | 5.1 PSI | 5.1 PSI | 5.1 PSI | 5.8 PSI | 5.8 PSI |
| Spherical Models | S60 | S70 | S80 | S100 | S120 | - | - | - | - |
| Minimum Pressure | 5.1 PSI | 5.1 PSI | 5.1 PSI | 5.1 PSI | 5.1 PSI | - | - | - | - |
| Tandem Models | T73 | T84 | T104 | T124 | T145 | - | - | - | - |
| Minimum Pressure | 5.1 PSI | 5.1 PSI | 5.1 PSI | 5.1 PSI | 5.1 PSI | 5.1 PSI | - | - | - |
INSTRUCTIONS
HOW-TO INFLATE
Inflation can be achieved with any hand, foot, battery, or turbine pump with a ⅞” standard Halkey Roberts style inflation adapter (image 2) capable of reaching 6 PSI. We recommend our turbine pump when a quick inflation is needed, or when inflating more than 6 fenders.
- Remove your Fendertex Fenders from their box or storage bag and unroll them completely.
- The inflation valve is located on the top of the fender between the two D-rings (image 1).
- To remove the inflation valve cap, twist counterclockwise and pull the cap out.
- Before inflating, be sure the valve stem located inside the Fendertex valve is in its upright (closed) position by compressing the valve stem and twisting it ¼ turn until it raises. When the valve stem is in its upright (closed) position, the valve will not let air out once inflated but will allow air to enter while inflating.
- Affix the inflation adapter to the inflation pump’s hose, insert the inflation adapter into the Fendertex valve and twist clockwise to lock it in place. It should not pull out.
- Inflate the Fendertex Fenders to the appropriate pressure listed on Table 1.
- Once inflated, twist the inflation adapter counterclockwise to remove.
- Re-insert the valve cap into the Fendertex valve and twist clockwise locking it in place while the fender is in use.
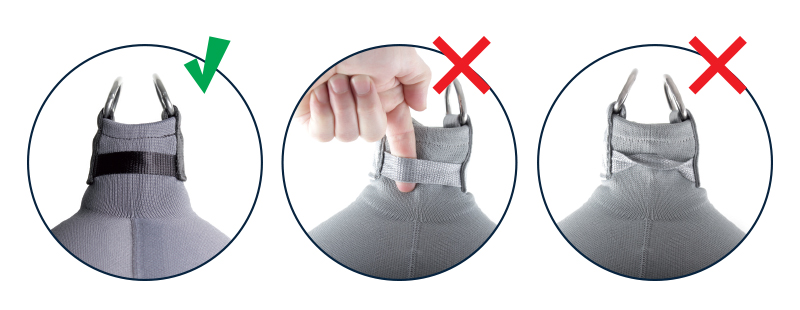
Image 3
Indications the Fendertex Fender is inflated correctly (image 3):
- The strap around the fender collar will be rounded and flat, not twisted, and tight enough that you cannot fit your finger behind it (for sizes C84 and up).
- The collar will become rigid and will not bend easily, and the fender should feel hard.
- Use a calibrated pressure gauge to get accurate measurements as noted on Table 1.
HOW-TO DEFLATE & STORE
WARNING - DO NOT USE THE VALVE WRENCH TO DEFLATE! This can cause damage to Fendertex Fenders or cause injury.
- Remove the inflation valve cap by twisting counterclockwise and pull the cap out.
- Compress the valve stem and twist a ¼ turn to lock it in the downward (open) position.
- After most of the air is out of the fender, roll the Fendertex Fender from the bottom to the top to expel all the air.
- Compress and twist the valve stem ¼ turn to its upright (closed) position and cap the valve so air or debris does not enter the Fendertex Fender while stored.
- Once the Fendertex Fenders are deflated and rolled up, they can be stowed in the Fendertex textile storage bag or a small cubby for later use.
CHECKING PRESSURE
Fendertex Fenders can hold pressure up to 6 months. During long term use, we recommend checking the pressure about every 2 months. To check the pressure, use a calibrated pressure gauge fitted to the inflation adapter. Add more air to the fender until it reaches the recommended pressure on Table 1.
REMOVING & REINSTALLING THE INNER BLADDER
Removing the Bladder:
Expel all air from the fender and close the valve cap. Using your thumbs on the D-rings, pull the textile away from the inflation valve and with your remaining fingers push the inflation valve from the bottom until it is sticking out of the textile layer. When the inflation valve is free, pull the entire bladder out of the textile layer.
Reinstalling the Bladder:
Roll both sides of the inner bladder to the center until it is a similar diameter as the textile layer’s opening. Insert the bottom of the inner bladder into the textile layer’s opening. Do not to twist or fold the inner bladder. Slide the bladder completely into the textile layer. The bladder is the same shape as the textile layer. It is important that the bladder is positioned inside the textile layer so that the sealed edges of the bladder line up with the sown edges of the textile layer and the orientation is the same. Position the inflation valve just under the hem of the textile layer’s opening so it is about the same level as the seam of the hem. Inflate the fender to fully position the bladder into the textile layer.
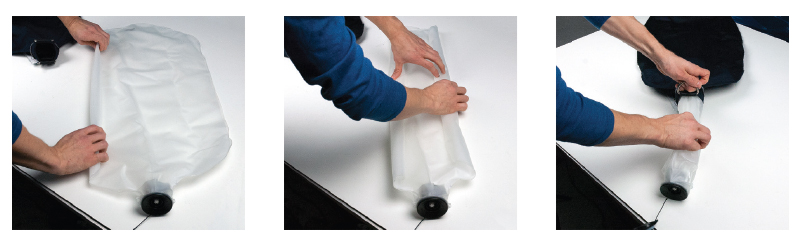
Image 4
In the case of puncture, a replacement bladder can be ordered. For custom sized fenders, we recommend purchasing spare bladders.
Image 5
BALLASTING
95% LIGHTER COMPARED TO PVC FENDERS
In the case of prolonged moorage (several months) and/or in the event of strong winds, you can add weight to your Fendertex Fender using the following methods:
Ballasting with a Weight:
Insert the Fendertex Weight (shown in image 5) into the Fendertex Fender (between the bladder and the outer textile layer). Work the weight to the bottom of the fender and inflate
----- OR -----
Pour up to 3 Liters of Fresh water in the fender bladder, depending on the size of the Fendertex Fender:
- C73 = ½ Liter
- C84 to C124 = 1 to 2 Liters
- C145 to C248 = 3 Liters
HANG ORIENTATION
All Fendertex Fenders come with two D-rings on the top which allows the fender to hang vertically. Sizes C73 and smaller come with a reinforced bottom loop allowing the fenders to be hung horizontally. For sizes C84 and larger, do not hang horizontally without a Longside Cover. If you wish to hang these fenders horizontally, you will need the long side cover (image 6).
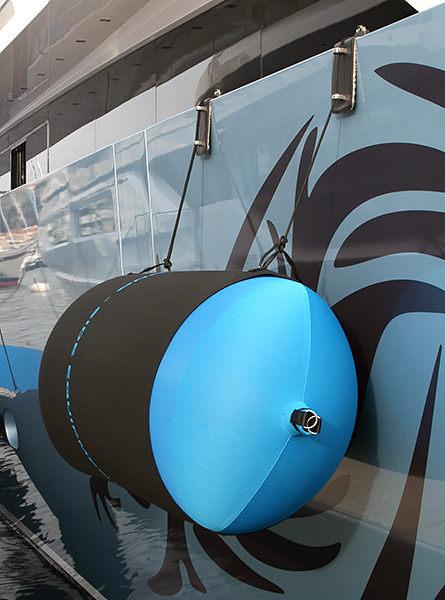
Image 6
CLEANING
Both the bladder and cover of the Fendertex Fenders are machine washable, including the bladder. Before washing, close the inflation valve and the valve cap, ensuring the valve is sealed. If the D-rings are not sheathed, secure a cloth around the D-rings to prevent damaging the inside of the washing machine. Wash the fender at no more than 104° F with a standard laundry detergent. If using harsh detergents, remove the bladder and wash separately. We recommend washing about twice per year.
DRYING
Fendertex Fenders will dry in a few minutes in the sun and will not retain sea salts that can scratch the hull of the vessel. Never iron or machine dry Fendertex Fenders.
![]() DO NOT TUMBLE DRY!!!
DO NOT TUMBLE DRY!!!
![]() DO NOT IRON!!!
DO NOT IRON!!!