How To Apply KiwiGrip
Here is a step by step guide on how to properly apply KiwiGrip non-skid coating. Be sure to also watch our demonstration video. Or if you'd like you can download the KiwiGrip instructions here.
Weather & Conditions
Like all paint products, KiwiGrip will cure properly only under suitable weather conditions. Fortunately, KiwiGrip benefits from a wide weather window. Relative humidity must be low enough for the water in KiwiGrip to evaporate before the co-solvents escape. Warmer temperatures allow for higher humidity. Do not apply KiwiGrip when drying conditions are expected to fall outside the permitted application window shown in the KiwiGrip Application and Drying Window on the first page. In all cases, KiwiGrip MUST dry according to Figure 1 before it gets wet or before relative humidity rises above 90%.
Avoid application in direct sunlight, which will elevate your deck temperature. Warm decks will reduce your working time, making it very difficult to get a uniform texture. KiwiGrip may be thinned with water 10% by volume to slow drying in hot and/or arid conditions.
Surface Preparation
Always apply KiwiGrip over a sealed surface to prevent water and co-solvents from absorbing into the substrate. Avoid solvents like acetone, MEK, paint thinners, etc.
Old Gel-Coat: Scrub old gel-coat with a stiff scotch pad or stainless wire brush and a good degreasing soap to remove oxidation, dirt and oil. A de-waxing agent is required if the surface has been waxed within 5 years.
Fresh Polyester or Epoxy Fiberglass: If the polyester or epoxy includes wax, this must be completely washed away with a de-waxing agent. Then sand well with 50 - 100 grit paper. Wash well with degreasing soap and water.
Aluminum or Steel: Metals require a primer to protect the underlying metal from rust, oxidation or corrosion. KiwiGrip is compatible with all primers. Apply primer per manufacturer’s instructions. Sand primer lightly with 100 - 220 grit. Wipe up dust at least 3 times with damp rags.
Wood: Wood needs a coat of paint or sealer to prevent water and co-solvents from absorbing into wood. Any paint or non-silicone primer is fine. When dry, sand paint, primer, or sealer lightly to remove any gloss. 100 - 220 grit is fine. Wipe with a damp rag at least 3 times to remove all dust.
Concrete: Concrete must be fully cured and sealed with any non-silicone sealer. Follow with a good soap and water scrub and allow to dry. If working with polished concrete and surface has any gloss, sand surface with 100 - 220 grit paper to remove any gloss. Wipe up dust at least 3 times with damp rags.
Tile/Marble/Porcelain: Surfaces must be free of oils, soap-scum, and contamination. For swimming pool decks, beware of body oils which may have built up over a number of years. Normally aggressive scrubbing with a good degreasing soap is sufficient for oil removal. Sand well to remove any gloss and offer an abraded surface for KiwiGrip to hold onto. Wipe up dust at least 3 times with damp rags.
Vinyl Flooring: De-wax with a de-waxing agent. Sand aggressively with 80 - 150 grit to remove gloss and add an abraded surface. Wipe at least 3 times with damp rags to remove dust. We suggest a small test patch to ensure a good bond. Remember to wait a few days before testing bond strength as water-based acrylics typically need a week or so to achieve full bond strength.
Replacing Carpet: Remove old carpet. With a belt sander or orbital sander, remove as much of the carpet adhesive as comes easily. Don’t worry about adhesive remaining in the grain or small shards of adhesive that are difficult to remove. If bare wood is exposed, seal as described in “wood” section of these instructions. KiwiGrip will get a good bond to remaining adhesive and the shards will be lost in the KiwiGrip texture.
Masking
If you are refinishing glossy surfaces, complete this work prior to applying KiwiGrip. Don’t worry about over spray that extends onto your nonskid areas. Interlux, Awlgrip, Sterling, Alexseal, Petit, Imron, and other linear polyurethanes require 3 days cure time prior to applying masking tape. Attention to masking will be well-rewarded with a professional result.
Masked corner radii can be quickly created using either of two methods:
- First, 3M stretchy fine-line tape (¼ inch width works well) is great for following a pencil radius scribed on the deck.
- Second, corners can be taped square and later trimmed with a light touch on an Exacto-knife following the circumference of a cup or can as a guide. Do not cut into the top-coat. Apply just enough blade pressure to score the tape for easy and controlled tearing.
After masking, sand the fresh topcoat with 60 to 180 grit. Take care to sand right up to the masking tape. Consider using a fine grit paper near the edges to avoid damaging the tape. Damaged tape can be easily repaired simply by applying another layer of tape directly over the damage. Follow sanding with several wipes with a damp rag to remove all dust.
Stirring/Shaking
For best results, mix each pouch by hand. With the lid sealed, squeeze the paint from the top of the pouch down to the bottom and back multiple times to ensure the product has not settled.
NOTE: Small granules of cured product suspended in the gel are a normal artifact of production. They will be lost in the texture. Stirring rapidly or shaking a partial pouch will introduce small air bubbles which will become micro-craters in your finished surface. These small craters do no harm, but make the surface more difficult to keep clean.
Application
Your technique will improve as you go, so to ensure an excellent outcome, practice first on cardboard or plywood before moving on to your deck.
Choose a small section on your deck for the first application of KiwiGrip. Proceed with small sections first, moving on to larger sections of your deck as you build experience and confidence. If you are not happy with a result, simply wipe up KiwiGrip with a damp rag and try again.
Work small areas at a time, starting with only a square foot. Using a large brush or notched trowel, apply a thick coating to the selected area. Apply at a rate of about one liter (quart) per 2 square meters (20 square feet).
Some customers prefer application with a serrated (notched) trowel commonly used for applying adhesive for tile setting. 3mm (1/8th inch teeth yields a thin, fine finish, much like sand filled topcoats) while ¼ inch teeth yield a thick coating with taller peaks and deeper valleys. A thin coat will give you a more refined look that is easier to keep clean but offers a shorter wear-life and won’t bridge hairline cracks well. A thicker coat will give you a more aggressive non-skid with long wear life and great crack-bridging but will be harder to clean.
Practice on cardboard, plywood, or right on your deck to choose a texture that is right for you. Keep in mind that not all surfaces demand the same texture. Understand, however, that moderate textures offer moderate skid resistance, and fine/gentle textures provide little or no skid resistance when wet.
With your KiwiGrip roller, evenly distribute the spread KiwiGrip over your small area. Once this is achieved, lightly roll back and forth over the surface in any direction (or multiple directions) to even out the texture. Finish the section with a few passes of your roller using a very light pressure. These last few passes will pop any bubbles that may have formed under the peaks.
Once the texture looks even and you are happy with the result, remove the masking tape and quickly move on to the next section. (*See note later about pulling the masking tape)
While KiwiGrip may be applied single-handed in cool conditions, it is best applied with the help of a partner. One person should be the designated applicator whose job is to apply a consistent amount of KiwiGrip ahead of the roller and to double back to pull the tape behind the roller. The second person is charged with evenly distributing the KiwiGrip gel on the deck and dialing in a consistent texture using the KiwiGrip texture roller. Trading jobs will introduce slight changes in texture which may or may not be noticeable.
If the KiwiGrip is drying too quickly, and you are having difficulty achieving a consistent texture:
- Work smaller areas, trying to keep a continuous process (maintaining a wet edge).
- Stop and wait for a cooler time (night time with lights or early morning after wiping up dew).
- Add up to 10% water to slow the drying process.
Note: Removing the tape while the coating is wet allows the edges to roll over and create a nice looking radius. If the KiwiGrip skins over and goes rubbery, you’ll need a light touch with a razor blade to remove the tape. Pulling your tape when KiwiGrip is almost dry, but not yet fully cured and bonded, will lift film from the deck.
If you are not happy with the evenness or result, wipe up the gel and repeat the application but use less (or more) material on the second try.
For a very aggressive texture, apply a thicker coat, allow the coating to partially dry, then re-roll to lift the settled peaks back up sharp. We call this back-rolling. You will have to experiment a bit to find the best delay for back-rolling in your conditions. We suggest you back roll every 5 minutes to find the delay when your KiwiGrip is thickening but not yet tacky.
After full cure (a few days) scrub your new decks with fresh water to remove a soap-like component that migrates to the surface during KiwiGrip’s cure.
Drying Time
Drying time is temperature and humidity dependent. At 60°F (10°C) you’ll have about 20 minutes working time before losing your “wet edge.” Normally, drying is well advanced in an hour at 70°F (23°C). Allow at least 4 hours before recoating. High humidity will prolong drying time - and offer longer working time.
You can walk on your new decks without shoes the next day. The product will be tough but slightly rubbery in less than 48 hours, and will reach final hardness over time. The bond strength continues to mature over a week or so.
Re-Coating
When maintenance or re-coating is required, remove all surface contaminants with boat soap to ensure the surface is completely clean and free of all grease, oils and or wax. No sanding is required - you simply need to apply the coating as you have done previously. If you are careful with the brush and roller, there is no need to re-mask. If you are uncertain of your technique, re-mask the surface to the edge of the previous KiwiGrip coating and then proceed. In general, you need only recoat areas where your peaks have worn down.
Make sure to test in an inconspicuous area to ensure color match before committing to the entire project.
Clean Up
Wash tools and equipment with fresh water while material is fresh.
Storing KiwiGrip
Be sure to purge all air from bag to preserve the KiwiGrip.
Custom Tinting
KiwiGrip can be tinted using any water-based universal tint system found at paint resellers. Limit tint to 3% by volume (20cc or 2/3 oz per liter). This is sufficient to create virtually any light pastel color. Please refer to the “Stirring / Shaking” section on page 4 after tint is added.
Application & Drying Chart
Maintain deck and ambient conditions as shown in each zone before allowing KiwiGrip to get wet.
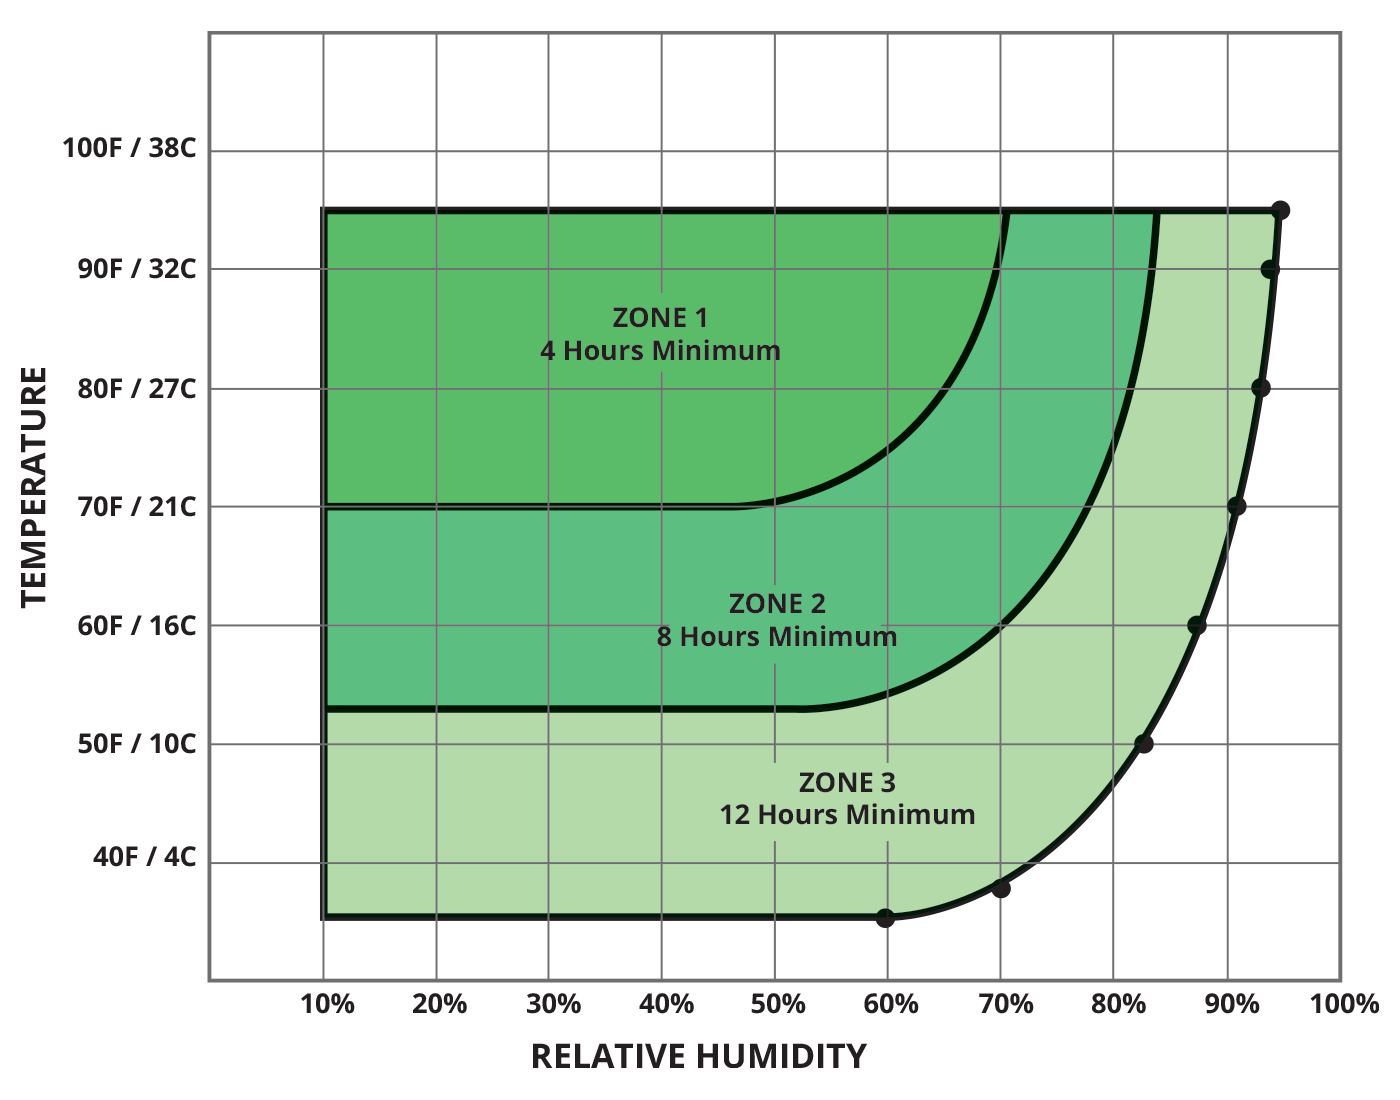
- Do not apply KiwiGrip if conditions are expected to fall outside application window before KiwiGrip is fully dry.
- Application in direct sunlight and in hot conditions significantly reduce tack time. (add up to 10% water to extend tack time).
- Drying time in cold conditions is significantly extended. (Moving air from a fan or breeze will shorten drying time).
Achieving Different Textures
With KiwiGrip non-skid you can customize the texture to your needs. Here are some recommendations for achieving a mild, medium or aggressive texture. We highly recommend testing on some cardboard before beginning.
Mild Texture
For a smooth to mild texture use a standard ⅜” nap roller found at your local hardware store.
Important Note: mild/fine/gentle textures are well suited to decorative applications where a tough, elegant, and easy to clean finish is required. However please note this may minimize the slip resistance when wet.
Medium to Aggressive Textures
To achieve a more aggressive texture simply vary the amount of pressure applied to the roller during the application process. Heavier pressure will result in a more aggressive texture. Backrolling once the paint has had the opportunity to dry for a short period of time (recommend letting it cure in 5 minute intervals then backrolling until desired texture is achieved) will pull the peaks of the paint up even higher resulting in a much more aggressive texture.